dalrymplem@gmail.com
(225) 806-1406
Louisiana Contractors License Numbers:
Residential-88665 Commercial-47782
Processes |
Our ProcessNew ConstructionWith all of the options available today, making selections for a new home can seem overwhelming. Many people aren't even sure where to begin. One method to prioritize selections and/or decisions is as follows: Determine the following prior to starting the foundation:
Having the decisions noted above are critical for the various trades to prepare everything properly for all that goes in, under, and around the foundation prior to the foundation being framed and/or poured. There are a host of other decisions that need to be made regarding insulation and energy conservation, flooring patterns, cabinetry details, colors, hardware, and so on. Try to clarify as much as possible in the plans and specifications so that you minimize decisions that have to be considered after construction is underway. The following is an example of the general sequence of events that unfold from start to finish on a concrete "slab on grade" type project:
Here is a good example of the kind of material you DO NOT want to build on - Building atop root matter and rich organic soil is a sure-fire recipe for disaster. Over time as the roots and organic material decompose the soil shrinks and whatever is on top of it sinks. This is also a prime example of the importance of having a thorough soil test done prior to starting construction. 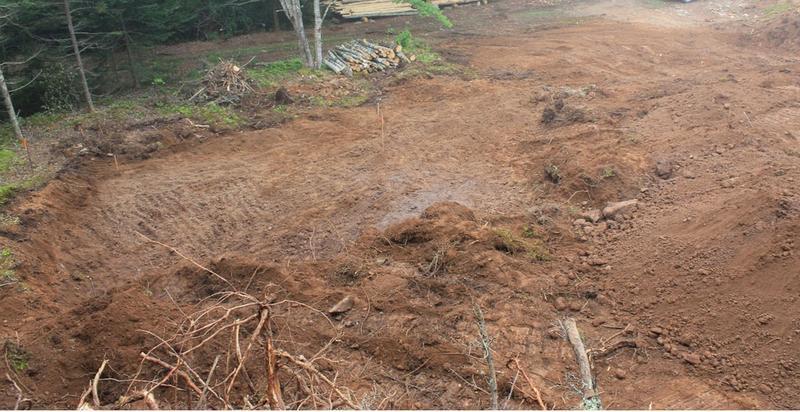
After removing all rich organic soil and especially all root balls and surrounding root matter, you can begin to bring in proper fill and compact it in the building area. After installation, the building pad should be roll tested and upon completion, the building pad should look something like this: 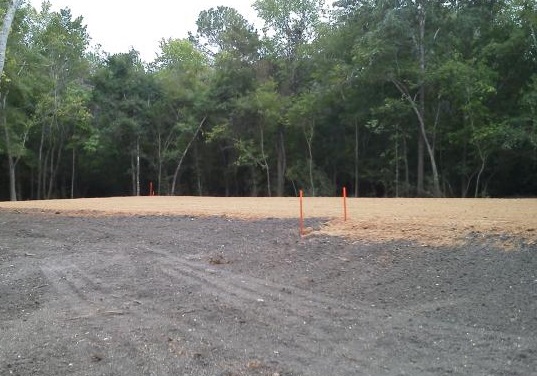
Building too close to trees and building atop expansive clay ( Fat Clay ) will almost certainly lead to foundation issues that will cause cosmetic issues at a minimum and can cause serious structural failures in extreme circumstances. Patches of ponding water around the slab as well as subsurface drainage leaks can lead to expensive problems as well. 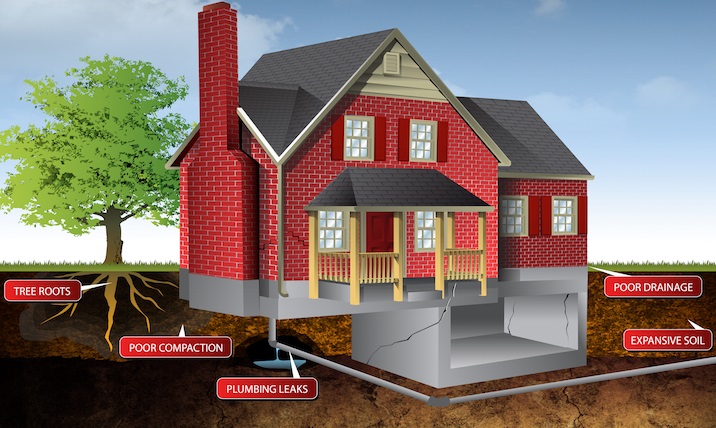
After the earth is prepared, it will be time to install subsurface mechanical, electrical, and plumbing components and then complete the foundation. Be mindful that if you elect to modify the location of components - such as appliances, sinks, in-floor receptacles, island cabinets and anything else that has to be roughed-in prior to the foundation being poured or framed - try to make those changes PRIOR to them being roughed in as specified by the plan. Making changes AFTER work is performed is VERY costly. ALL changes cost time and most changes cost money and making changes after installation has begun is the most expensive route one can take which is why it is very important for you to be intimately familiar with your plans and understand them clearly. However, in many cases it is better for you to bite the bullet and pay what it costs to make changes rather than get the whole thing completed and live with the regret of not having positioned things in the manner that suits you best. Moving forward you'll have to frame the building shell and then install the myriad of components specified in the plans. Try to familiarize yourself with more than just cosmetic items, consider the pros and cons of various core components such as doors, windows, wall types, insulation, roofing, mechanical, electrical, and plumbing components. Educating yourself on the various options we have in this day and age will help you to make the best possible decisions for your specific situation. Back to Top |